
Being a food blogger doesn’t mean I want to cook all day. This homemade Taco Bell Chalupa recipe is proof that you can skip fast food and still keep things easy. I know my ingredients, save money, and end up with crispy chalupas that taste even better the next day.
Growing up, I loved simple fried breads, especially Hungarian lángos, served warm with sour cream and shredded cheese. It was humble, comforting food made from basic ingredients, yet it always felt like a treat. That memory came back to me when I started making this homemade Taco Bell Chalupa recipe in my own kitchen.
These chalupas fry up with that same golden, crispy exterior I remember from childhood, while staying soft and doughy on the inside, just like lángos.
Now, instead of only sour cream and cheese, I fill them with taco meat, beans, and fresh tomatoes. It’s a familiar comfort food with a fun twist and a homemade way to recreate those cozy flavors while feeding my family something budget-friendly and made from ingredients I trust.
Why This Homemade Taco Bell Chalupa Recipe Works Every Time

It’s actually easy to make – Even though I’m a food blogger, I don’t want complicated recipes. This homemade Taco Bell chalupa recipe uses simple steps and basic ingredients, so it works even on busy days.
Perfect crispy and soft texture – The chalupa shells fry up golden and crispy on the outside while staying soft and fluffy inside, just like the Taco Bell version, but homemade.
You can fill them however you like – One of my favorite things about this easy homemade chalupa recipe is how customizable it is. Taco meat, beans, fresh tomatoes, cheese, or whatever you already have in the fridge all work.
Homemade beats fast food – Making chalupas at home means I know exactly what ingredients I’m using. No mystery add-ins, just real food made in my own kitchen.
Budget friendly and great for leftovers – This recipe costs less than ordering out, and I usually have leftover chalupa shells or fillings for another meal.
Made for real life, not perfection – This is the kind of recipe you can make without stress. It’s simple, forgiving, and delivers great results every single time.
Ingredients and Substitutions
These are simple pantry ingredients, but a few small choices make a big difference. I’ve made this homemade Taco Bell chalupa recipe many times, and these notes come from real trial and error.

- All-Purpose Flour – This gives the chalupa dough the right balance of structure and softness. I recommend using fresh, all-purpose flour for the best texture. If your dough feels too stiff, add a splash of milk. If it’s sticky, dust in a little more flour. You can replace up to half of the flour with bread flour for slightly chewier chalupa shells.
- Baking Powder – This is what makes the dough puff up and stay light once fried. Make sure your baking powder is fresh. Old baking powder will give you flat, dense shells.
- Melted Butter – Butter adds richness and flavor and helps create a tender crumb inside the shell. I usually melt it and let it cool slightly before adding it to the dough. You can use olive oil or neutral oil, but butter gives the best flavor.
- Milk – Milk keeps the dough soft and easy to work with. I usually use whole milk, but any milk works.
- Salt – Salt brings the whole dough to life. Without it, the chalupas taste flat, no matter how good the fillings are.
- Oil (for frying) – Oil is what creates that golden, crispy exterior while keeping the inside soft. Use an oil with a high smoke point. Best options: vegetable oil, sunflower oil, or canola oil. Keep the oil at a steady medium heat. Too hot and the shells brown too fast. Too cool and they absorb oil.
How to Make the Best Homemade Chalupa Recipe
Once you have all your ingredients ready, the process is surprisingly simple. I’ve made this easy homemade chalupa recipe many times, and these small details help ensure consistent results every time.
Prepare the Chalupa Dough
Mix the dry ingredients
In a large bowl, combine the all-purpose flour, baking powder, and salt. Whisking helps distribute the baking powder evenly, which gives you better rise when frying.

Add the wet ingredients
Make a well in the center and pour in the melted butter and milk. I like to add the milk gradually so I can adjust if the dough needs more or less moisture.

Bring the dough together
Mix until a soft dough forms. It should feel slightly tacky but not sticky. If it’s too dry, add a tablespoon of milk. If it’s too wet, sprinkle in a bit more flour.

Knead the Dough
Knead the dough on a lightly floured surface or directly in the bowl for about 2 to 3 minutes.

You’re looking for a smooth, elastic dough that springs back slightly when pressed. Over-kneading isn’t necessary here.
Rest the Chalupa Dough
- Cover the dough with a clean kitchen towel or plastic wrap.
- Let it rest for 15 to 20 minutes. This step makes a huge difference. Resting relaxes the gluten, making the dough easier to roll and helping the chalupas puff up nicely when fried.

Divide and Shape the Chalupa Dough
Divide the rested dough into 8 equal pieces, about the size of a golf ball.
On a floured surface, roll each piece into a round, about 1/8 to 1/4 inch thick.
Don’t worry if they’re not perfectly round. Slight imperfections actually fry up beautifully.

Cook the Chalupas
Heat oil in a deep skillet over medium-high heat. You want enough oil so the dough can float and puff up.
Test the oil with a small piece of dough. If it bubbles immediately, it’s ready.

Carefully slide one piece of dough into the oil and fry until it puffs up, about 1 minute per side, flipping once.

Using tongs, gently fold the chalupa in half and continue frying until both sides are golden brown, about 2 to 3 minutes total.
Chef tip: Keep the oil temperature steady. If it’s too hot, the chalupas brown too fast. Too cool, and they absorb oil.
Drain and Cool Slightly
- Remove the chalupas from the oil and place them on a paper towel-lined plate to absorb excess oil.
- Let them cool just enough to handle, but serve while still warm for the best texture.

Serve Warm
Chalupas are best served fresh and warm.
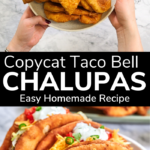
Fill with seasoned taco meat, beans, shredded lettuce, diced tomatoes, cheese, sour cream, salsa, or any toppings you love.

Toppings And Filling Ideas
One of the reasons I make this homemade Taco Bell chalupa recipe so often is because the toppings are endlessly flexible. These are the combinations I come back to again and again, depending on what I have in the fridge and who I’m cooking for.

- Classic combo – You can never go wrong with shredded lettuce, diced tomatoes, shredded cheese, sour cream, and salsa. It’s simple, familiar, and always a hit.
- Protein-packed favorites – Seasoned taco meat or refried beans topped with sliced avocado or guacamole and a few diced onions make these chalupas extra filling and satisfying.
- Vegetarian option – Black beans or pinto beans paired with sautéed bell peppers, onions, and mushrooms are one of my go-to meatless choices. I usually finish them with corn salsa and fresh cilantro.
- Tex-Mex – When I want something a little different, I add queso fresco or cotija cheese, pickled jalapeños, chipotle mayo, and a spoonful of cilantro-lime rice.
- Breakfast chalupa – Scrambled eggs, crumbled breakfast sausage, diced green chilies, and salsa verde turn these into an easy weekend breakfast or brunch idea.
- BBQ-style chalupa – Pulled pork or shredded barbecue chicken topped with crunchy coleslaw, sliced red onions, and a drizzle of barbecue sauce is always a crowd favorite.
- DIY chalupa bar – For family dinners or gatherings, I love setting up a chalupa bar. Everyone can build their own, which makes dinner fun, easy, and stress-free.
Storing and Reheating Chalupas
Storing
- In the fridge: Let the chalupas cool completely, then store them in an airtight container. I like to separate layers with parchment paper so they don’t stick together. They keep well in the refrigerator for up to 4 days.
- In the freezer: Once fully cooled, wrap each chalupa individually in plastic wrap or foil and place them in a freezer-safe bag or container. They freeze well for up to 2 months and are great to have on hand for quick meals.
Reheating
- Oven (best for crispiness): Preheat the oven to 350°F (175°C). Place the chalupas on a baking sheet and heat for 5 to 10 minutes, until warmed through and crispy again.
- Microwave (quick option): For a faster reheat, cover the chalupa with a damp paper towel and microwave in 20 to 30 second intervals until warm. The texture will be softer, but it works well when you’re short on time.
This makes homemade chalupas easy to prep ahead, store, and enjoy anytime.

Troubleshooting
- Chalupa Dough Is Too Sticky. Add a small amount of flour (1 tablespoon) while kneading until the dough reaches a smooth and non-sticky consistency.
- Chalupa Dough Too Dry. Gradually add small amounts of milk while kneading until the dough becomes moist and elastic.
- Chalupas Not Puffing Up During Frying. Ensure the oil is at the right temperature (medium-high) before placingthe chalupas in. Also, check if the baking powder is fresh and accurately measured for leavening.
- Chalupa Not Holding Shape. Check the consistency of the dough. It should be elastic enough to hold its shape. Adjust the milk or flour accordingly during preparation.
- Burnt Chalupas. Lower the heat if the oil is too hot. Keep a close eye on the chalupas during frying, ensuring they don’t stay in the oil for too long.

Easy Homemade Taco Bell Chalupa Recipe
Ingredients
- 3 cups All-purpose Flour
- 1 ½ tbsp baking powder
- 1 tsp salt or to taste
- 2 tbsp butter melted and slightly cooled
- 1 ¼ cup milk
- Oil for frying vegetable, canola, or sunflower oil
Instructions
- Prepare the Dough. In a large bowl, whisk together the flour, baking powder, and salt. Make a well in the center and add the melted butter and milk. Mix until a soft dough forms.
- Knead the dough in the bowl or on a lightly floured surface for 2 to 3 minutes, until smooth and elastic.
- Rest the Dough. Cover the dough with a clean kitchen towel or plastic wrap and let it rest for about 15-20 minutes. This allows the gluten to relax and makes the dough easier to handle.
- Divide and Shape. Divide the dough into 8 smaller, golf ball-sized portions.
- On a floured surface, roll each portion into a flat, round shape, about 1/8 to 1/4 inch thick.
- Cook the Chalupas. Heat oil in a deep skillet over medium-high heat. Fry one dough round at a time until puffed and lightly golden, about 1 minute per side.
- Carefully place each rolled dough into the hot oil. Fry until they puff up, flipping them halfway through. This should take about 1 minute per side or until lightly golden.
- Fold each chalupa in half using kitchen tongs and continue frying until both sides are golden brown. This should take an additional 2-3 minutes.
- Drain and Cool. Once the chalupas are golden brown on both sides, remove them from the oil, and place them on a plate lined with paper towels to absorb excess oil.
- Serve warm and fill with your favorite toppings.
Notes
- Chalupas are best filled just before serving to keep them crispy.
- Store cooled shells in the fridge for up to 4 days or freeze for up to 2 months.
- Reheat in the oven at 350°F (175°C) for best texture.
Nutrition Information
The nutritional information provided on this website is intended to be a helpful reference and convenience for our users. It is offered as a courtesy and is based on data primarily sourced from the USDA Food Composition Database.
We kindly request that you do not take screenshots or copy/paste our recipes to social media or other websites. We would greatly appreciate it if you could instead share a link to our recipe along with a photo.

Made these 2 nights ago; they were awesome!